søndag 31. mars 2013

Game of Thrones Dragon Easter Egg

And I mean actual easter egg. My easter hobby is to take ordinaty easter eggs and make them better - usually inspired by game culture, see: Portal Turret Egg and Protoss Pylon Egg


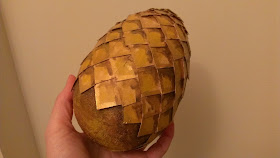
My first observation was that the eggs are not completely covered in scales, the bottom is rougher.

This is what I used, one ordinary easter egg, packaging carton and hot glue. 

Building up scales

More scales

Rady for paint

And of course, I forgot to take pictures during the paint job. In short: I painted the entire egg ocre, then I added dark brown shadows under each scale and on the bottom of the egg. I finished with gold paint on the edges of each scale. 


game of Thrones Dragon Easter Egg

With candy (and some of it healthy)

tirsdag 26. mars 2013

Protoss Pylon Easter Egg

My new easter tradition is to make an easter egg for my boyfriend inspired by geek culture. Last year I made the portal turret easter egg. Portal easter egg

And since he is a StarCraft player I made a Protoss Pylon style. 

My rule is to use an ordinary easter egg as a base - and it must contain candy.  

I started out with cardboard mockups which I later covered with paper clay.

Then we skip a few steps because of missing pictures. The parts below are hand sculpted out of paper clay and spray painted gold. 

Then a layer of blue

Then some more light blue details

And some finishing touches

Then it is the impossible task to make a easter egg like this look like a crystal. I didn't succeed 100% but hey, there is candy inside. 

For the paint job I started off with a white base while adding light blue detailing with a sponge. 


And darker blue shading. 

Put it together and I hope you see the resemblance.

Happy easter

mandag 4. mars 2013

More brains! Zombie part two

So I have this ready from my Zombie time post. Please note that all blood and teeth are fake. The blood is acryllic paint, and the "teeth" are made from fake nails, please see previous post about how this appliance was made.

Next step will be to make the rest of the face. First put on contact lenses, I think it makes a zombie makeup so much better. 

Then the process is much the same as last time, put latex and paper over your face. 


Blend with a sallow facepaint. The rough texture enhances dead zombie skin. 

And peel back your skin. 

Now you put the other mask in this hole and glue down with spirit gum. Seal the edges with more latex. Paint the inside of the skin edges/flaps red with brown edges, add some blood and dark circles under the eyes. Since I was going to the movies I did not use too much blood as to not make as mess on their interior, but next time the teeth and skin will be dripping. 
All blood and gore effects are makeup

And next time I will use this in an Alice in Zombieland style :)