mandag 27. juni 2016

Alice from Madness Returns - Misstiched dress

There is something fascinating with the dark world of Alice madness returns and I can't deny that I love all the dresses from this game. But to manage to make even one I need to focus on just one, so here's how I made the Misstiched dress from the doll house world. See here for the tutorial for how my Hobby Horse was made.
Concept art from official art book (Spicy Horse)

Another reason to make this was to get a costume to pose together with my Vorpal blade (commissioned from Stickweed). 

The bodice
The base for the bodice is sewn with a Burda pattern I had laying around, using a cotton fabric with iron on interfacing and a zipper in the back. Zipper was supposed to be invisible, but something is wrong with my invisible zipper foot, oh well. 


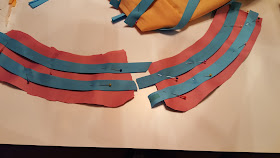
Finding a peach colored fabric with turquoise stripes proved to be a challenge. So my plan would be to sew each stripe on by hand. I have seen other people do this, and from looking at other peoples work I made a few conclusions. 

- From the ref photo it looks like there's some shine to the stripes meaning satin ribbon would be perfect according to this. Problem here is that every tiny tiny wrinkle will be very visible when sewn to the bodice, and the satin ribbon will not reflect light well in photos. 
- I have seen sewing senpai J.Hart Design use french gimp braid for the stripes, this will get a more luxurious feel and more texture. Problem I found was that finding the right color was not so easy from Norway, and the stripes ended up being very thin. 

Here's my cotton bias tape, satin ribbon and french gimp braid. 


My solution ended up being bias tape, great width, folded edges, no shine (at least from the ones I chose) and a wide variety of colors. 


The poofy sleeves were made from altering the sleeve pattern to a poofy pattern, I found this tutorial here.


My sleeves needed stripes and a pink frilly edge. 

Sewn to a hoop and gathered to fit my arm in one end. 

Testing the shape by pinning the sleeve to my bodice. 

The pink frills on the sleeves are polka dotted in the ref photo, and I ended up using rhinestones to get a more interesting texture. These are hot fix stones, which means that there's embedded glue into them which activates when heated. And instead of buying a "hot fix want" I use my soldering iron to heat them up. (I still need some practice, ended up with a few burns on my fabric :S 

I also need a collar with same blue stripes (only going in two directions)


I made two of these and sewed them onto the neckline of the bodice. Then they were under stitched to lay better. A hook was sewn into the nape by hand. 


All that is left is detailing, adding over sized decorative stitches, ripping the sleeve and weather it :D


Last thing I added was the buttons in front. These are hand painted wooden buttons. The color is a little off in this photo due to the light. 

Buttons are sewed on with pink satin ribbon

The over skirt and apron
I found the perfect pattern for the tartan over skirt. This was sewn as a circle skirt. More info on how to sew a circle skirt here. 
And I found this perfect fabric

The apron was sewn from two pieces of white canvas with iron in interfacing. lace and white bias tape was sewn to the edges. 


Then the entire piece was dyed using tea :D And the pockets were sewn from the same fabric as the skirt and bow. The symbols are made from foam to get a crisp edge. 


The entire apron is sewed onto the pink waistband. The waist band has a zipper in the back and is then attached to the tartan skirt. 


A test on laying on the floor

And one where my sister is modelling it for me. 

The bow and hollow yves
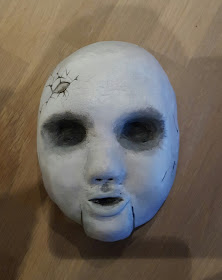
To ensure I would always have the perfect bow I made it as a separate piece together with the dolls head (Hollow Yves). The doll mask was made by molding paper clay and then using this as a mold for worbla. I used black worbla this time for get the surface as smooth as possible. 

Then with acrylic paint I painted the detailes. 


The underskirt and crinoline
The pink underskirt was also sewn as a circle skirt. I then sewed on a folded strip of the same fabric in folds along the edge. 

To prevent the bodice to slip up I sewed the underskrit to it. 

To get the big volume for the skirt I used a petti coat and a crinoline. I had a huge crinoline from my Morrigan dress, but it was floor lenght. So to save some money I sewed in ribbons on the inside of the crioline to I could bind it up to be knee lenght when I need to. 

The gloves
I actually had a pair of old stockings with the right colored stripes. 

So I just transformed these into gloves by pinning down finger tubes. 


And lastly I added the pink frills. 


The pink frills of the gloves also needed polka dots, bring on the hot fix rhinestones to match the sleeves. ^_^

The necklace
Having access to a lasercutter makes thing much easier. The omega for the necklace was cut out of MDF and sanded down, then primed and painted. 


Makeup
I will make a makeup video tutorial later, because I ended up being really happy with how this makeup turned out :D

Now we just wait for amazing photos from the photoshoots <3

torsdag 9. juni 2016

Transistor Sword - a closer look at the electronics

I have written about how I built my Transistor sword here, but I did not explain the electronics in detail. But fear not, here's a little more rambling about how I made the talking and glowing parts of my sword. 

First things, I don't know how to program, I want to learn, but until then I hack other objects to do as I want. So I still think this is a fairly simple electronic build. I had a friend try to help me with an arduino, but as the rules for the competition said strictly do everything yourself, we mostly planned and worked on this solution for later. 

What does the sword do?
If you have seen the trailer for the game Transistor, you know that the sword glows green-ish while it talks. It also has a corrupted mode where it glows red instead and completely different quotes. 
Official Transistor Trailer

So I need it to 
- talk 
- glow green
- glow red
- separate mode where it glows only while it is talking

Talking
I could have made a sophisticated solution with a SD card and an arduino, but instead I bought a small Bluetooth speaker. I ripped out the inner electronics, to make it more compact and actually fit inside the cross guard of the sword. 

This way I could just pair the speaker with my phone and play music and quotes directly from a music folder I had stored on Dropbox. This also gave me a lot of freedom to add new files or have the sword play random stuff from YouTube and such. 


To get the quotes from the game I recorded myself playing the sections with required monologue. I also had a friend with an amazing voice record the quotes I needed for my show, so I had a nice dialogue in his voice running through the sword. This made sure the voice had the same pitch all though my show, but for random talk I could use game files. 

The game music can be bought here

Ok, the sword now talks!

Glowing
If you know a little about electronics this is a very simple step. I had never worked with LED strips before, but by Odin, how I loved it. I shall always work with LED strips if I can from now. 


The ones I bought were single color, meaning I had one strip for red and one for green. I know there are RGB strips that let you program your single strip to glow in any hue you want, but I did not dare with my limited time to try this. 

How to use LED strips you ask? They come in large spools, allowing you to cut it at desired length as long as you follow the markings. 

After you cut it you solder on a positive and negative wire and this strip of light is ready for the rest of your circuit. 


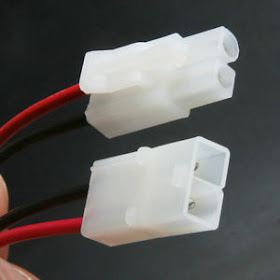
But wait a minute, my sword can be divided into two! How to still make it glow all over? Well, I just used connectors, follow the direction of the current so you always know which way it flows and you can easily divide the cord. 


Now add a battery and we get it glowing. 


Check, the sword now glows green. 

Adding the corrupted mode. 
A three way switch can help make the sword go from normal to corrupted in a second. Then I soldered and added strips of red LED strips. 


Also the eye will always glow red, no matter if the rest of the sword glows red or green. And it shall not react to sound. These eyes could also be disconnected from the sword using smaller connector pins. 

Another checkpoint reached, we have several modes. 

Lights reacting to sound
With both sound and lights working, we need to bring them together so that the lights react to the sound coming out of the Bluetooth speaker. Again, if I you program an arduino, that would be a gorgeous solution. But alas, I just hack stuff. 

When I made my Tali helmet I found out that you could buy cheap (ish) voice changers, which had light indicators. So I bought one of these, ripped off all the parts I didn't need, attached my own lights and voila. It has a small chip and a microphone that together would make my light glow when exposed to sound. 


So I placed the mic next to my Bluetooth speaker parts and "it was alive!"

Also I wanted a mode for continuous glowing, so the sword would still look cool even without my spamming the hallways with transistor quotes. Switch #1 has three modes: green - off - Red. Switch #2 has two modes: Sound reacting - continuously glowing. And all the holes are where the speaker is placed.
Photo: Frida Tørring

This ended up being my final diagram, which I taped to the inside of the cross guard lid in case I needed to emergency repair something. 
Photo: Frida Tørring

And here's the inner guts of the the cross guard (remember, it can be opened and closed because of magnets). On the left side if the bluetooth speaker and the sound reacting chip (alternate power source). On the right side is the batteried for the main circuit (8xAA) and a switch for the red eye lights. 
Photo: Frida Tørring

Want to see the sword in action, here's a video of it talking :)

And a last photo of my Transistor Sword and my Transistor Tattoo <3