onsdag 31. juli 2013

Vi hands - Upgrade!

I really liked my first set of hands, but good can be better. So this is how I built my initial hands and this is how they looked. And here is a link to tutorials of all the other parts of the Vi costume.


Photo: Pål Andresen

There are several things I wanted to do better
  • More dimension on the back of the hand, it looks a little flat from the side. 
  • Better blue crystal, again too flat.
  • Better finger joints
  • Overall better finishing on details
  • And make it steam!
And this is how I solved these issues.

More dimension
In short add more foam, which means everything have to be repainted. I only had to build up on the very top and the lower part of the hand, and to make it a little easier for my self, I covered some of the surfaces with card board. This is because the foam is very porous and it would take some filler to get that smooth surface which again means more weight (I am a puny girl, make it light weight please).


Close ups of what have been added. 


Then I evened out the surface with filler and repainted the body. 

And this is why you should weather and add more than one color. On the left mono chromatic gold, on the right gold, warm brown and dark brown (and still more to come)


That blue crystal
I made a mold for either vacuum shaping or cast in resin. My first attempt on the resin cast was a failure, and since I finally found a workshop with a thermo vacuum machine this would make a more light weight crystal. (I'm not kidding, every gram counts for me when carrying these).

The crystal was made with paper clay around a tin foil core, sanded down and covered in spray paint (gold was closest apparently).

The cast/pull was made from transparent thermo plastics which I spray painted blue on the inside. 


The fingers
The springs I used initially did not create enough tension to flex the fingers, so I added small strips of plastic (from el strips actually) 

The fishline going through the finger


And the fishwire goes into the base and a key chain ring.


I even filmed and tried to explain better how they work. 


Make it steam!
I am a sucker for extra features, it already glowed and moved the fingers, so the next level is making it steam like it does in the animated login video. 

Luckily the base of the hands are hollow, so I have room to integrate the steam system. You can see the result in the video of my performance a little further down. Later I will film the gloves close up and how the steam works.  

How did I do it you wonder? I started with a smoke detector tester which emits a non toxic gas. 


To activate it I used a small model plane servo, a battery pack and a servo tester, because the servo doesn't start spinning unless there is a signal telling the rotor which position it shall stand in. Just hooking the servo to a battery just won't do it (I learned that from trial and error).

Then I just needed to attach the servo to the spray can nozzle, clay and gaffa did it. In the video below you can see how it works before I install it inside the hand. 

My Fantastic smoke effect. 

Photo: Tobias Keijser

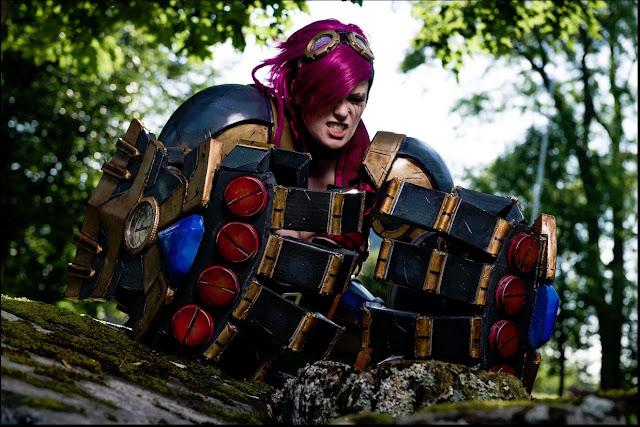
Finished hands
This is how it looks now with integrated steam, lights detailing and the shit. And a video of my performance, steam in action. 


And here are a few shots of the upgraded hands


Smash rock!
Vi cosplay
Photo by: Joacim Schwartz

tirsdag 30. juli 2013

Nordic Cosplay Championship (NCC)

Woah, Närcon and NCC is over, and I had the best time. I was part of the Nordic Cosplay Championship competition and I won third place with my Vi costume, OMG. This is so big, and this competition is definitely the biggest I have entered. A big congratulation to first place winner Shinji Cosplay and to Riku-Risa for second place, both amazing cosplayers from Denmark. 


Photo by: Joacim Schwartz

NCC
If you haven't heard of NCC before then let me give you a short introduction. Last year Närcon arranged the first competition where they put some of the best cosplayers from all of the Nordic countries up on stage to compete the the Nordic title. In difference from the traditional competition this competition focuses more on stage shows, letting the contestants use light, music, video, stage props and assistants to create a great show. 


The winner, Danish Shinji with some of her props in the back. Photo by Gustav Erik Borg/LordNerf

Qualify
Every Nordic country, Norway, Sweden, Denmark and Finland, sends four contestants each. And it was an honor to get to know all the talented cosplayers from the other countries, see this flickr album for photos of every contestant

In Norway these four conventions chooses one contestant each: 
I was the representative from Banzaicon this year, where I won first prize with the first iteration of my Vi costume. I didn't have time to make something new and awesome before NCC so I used Vi again, however I upgraded it - a lot.

Me after winning at Banzaicon. Photo: Danarki

VIP
I have found out that I like being treated as a queen and the NCC contestants got VIP treatment at Närcon. They paid for our travel expenses and sleeping quarters, and we had a dedicated room for storing and fixing our costumes. Even free food and drinks were occasionally presented.

And we got to bring an assistant, who also got free entry and a VIP pass, to help us with getting the costumes on, carry props and run around being awesome helpers. I was Lucky to have Grethe Brandtzæg as my assistant, one of the competitors from last year, so she knew very well what I should pay attention to concerning the show. 

Making a great show
Still with some misinformation we ended up with many very impressive shows. All the contestants got two rehearsals on stage before the main event, to make sure that all the details were perfect. 


As I mentioned above we got much more possibilities to create a great show on the stage at NCC. Most conventions in Norway, let you play your own music and might even dim the lights for you but here you could add a video in the background and get the light technicians to adjust the light show to your specifications. In other countries, especially Denmark, they have a more tradition for using props, and I mean full on stage props, back screen, tables, chairs etc. Both first and second place had a lot of stuff happening on stage during their performance. 


Second place winner Riku-Risa and many of the stage props in the back. Photo: Daniel Ahlberg

But we could also bring an assistant on stage, something I am missing in the Norwegian contests, as we are only allowed to be one on stage at any time. Since I was going on as Vi I got my good friend Tine Marie Riis as Caitlyn helping me on stage, "nice headshoot cupcake".  

Tine as Caitlyn and Øyvind Krogsrud, NCC champion from Torucon, as Full Metal Jayce. 

My performance
My stage show as Vi was filmed, take a look. And I have to mention that the Norwegian contestants were the only ones to do live dialog on stage, lots of cred to Øyvind Krogsrud and Caroline Mikkelsen for their live performances. In other countries they are more accustomed with lip syncing to playback audio log.

Yes, I have included steam in the hands this time. 

All in all this was extremely fun and people have given me fantastic feedback. And the feedback from the judges also gave me a super confident boost. 


Judges watching the show. Photo: Daniel Ahlberg

What the judges liked:
  • My play, they said it was fun and easy to follow even if you didn't know the character or game. 
  • And a good balance with the use of assistant/Caitlyn on stage (not too much, since they were judging me, not her).
  • For being in character, hell I was in character all the time and even during my interview with the judges. How could I not, they had a VIp room ;)
  • For using a lot of techniques: clay molding, wig styling, needle felting, make up (with face piercings) sewing and pattern making, worbla, card board and faux leather, lighting, soldering, foam, mechanical parts, thermo vacuuming  electronics and steam. 
  • And they really liked the wig 
  • And my paint job. 
  • And that I actually shaved my eyebrow. (dedication)

But without any improvement points you can't get better. 


  • Better seems/sewing. The judges were really good with seems and fabric, which is not my strongest side. So I might take a course in sewing to get better, so far everything is self taught. 
  • And it was still a little too visible that I had used card board on the gloves. So even more focus on detailing and finishing with my future costumes. 


Prizes
The first place winner got a trip for two to Japan (wouldn't mind that) second got an iPad and I got a 1 000,- (SEK) shopping spree at one of the shops at the con. 

But what I liked the most was that all the contestants got framed photos of their costumes from the photo shoot at the convention. 


My photo is definitely going up on the wall. The framed photo is taken by Joacim Schwartz


photo by Joacim Schwartz

Vi Cosplay revisited

Närcon was a blast and I got to enter NCC (Nordic Cosplay Championship) as a representative for Norway. I can get used to that VIP feeling, with back stage passes and free food. 

With only two month from the nomination to the NCC contest I didn't have time for a brand new elaborate costume, so I made my Vi even more awesome. 


And I have gathered shortcuts to all my Vi tutorials here
Now let's start some new costume adventures!

mandag 29. juli 2013

Materials and techniques

I use several materials and techniques which might not always be familiar to everyone. So I will use this post to explain more in depth about the point I usually gets questions about - and I will add stuff to this post when I learn something new. So it will be regularly updated. 

If there is anything I have done that you wish that I could explain better, just send me an email or comment below.

So far this post cover the following topics:
  • Paper Clay
  • Lights
  • Weathering
  • Worbla and gesso
  • Corsets
  • SFX makeup (latex, mastix and gelatin)
Paper clay  
Paper clay is like a mix of clay and paper mache. It is clean, odorless and easy to use. I use it mostly because it air dries, you don't have to bake it in an oven for it to cure/harden. 

It can be shaped, sculpted or molded very easily while it's moist. It adheres easily to wood, canvas, and most surfaces without glue!  When dried, it's similar to a soft wood, it may  be carved or sanded after it has hardened. Paper clay can be painted with any kind of paint; it's just like painting on wood or paper. 
You can buy it in most craft stores (or Clas Ohlson in Norway)

Examples of what I have made with paper clay; Elvish staff, Kraken Staff, Vi goggles

Lighting, soldering and electronics
All cosplays looks 10 000 times better with lights, or that is my opinion at least. But light doesn't have to be complicated, I have a few tips to make it easier. 
  • El wire
This is a glowing wire ready to plug into a suitable or included battery pack. Very easy and fairly cheap, but the effect is not the best especially in daylight. Still no wiring needed, just plug and play. You can get them at e.g ebay in any color. 


  • LED key chain lights.
I love these, one light ready with battery and switch. Just glue/tape it on where you need a single light. I have used these in my Big Sister syringe and arm guard, and for the blue part of the Vi chest piece. In Norway you get these at Biltema in several colors.  


  • Flash lights
If you have room for it why not use a flash light, I did that for my Elvish Staff. The staff is hollow so I placed a flash light under the transparent ball and it gives an extra effect. 


Weathering - adding life to you prop
To create a depht in your props they need to be wathered, hightlighted and shaded. This paint job can really make you prop look realistic, like you have dragged your gun through the mud. 

For weathering you paint your prop in the base color you want and then add a darker wash (runny paint) over the first layer and wipe it off. Then the darker color will set in cracks and lines adding depth. 

This video from Volpin props shows really well how this process is done: 

When done you add ligther paint (silver/white etc) on any high point to create high lights. 

For battle damage you can use a technique called Dry Brushing, where you dip the only the tip of a dry brush in light paint (just a hint of color) and drag it lightly across the area where you want the effect.

Worbla and Gesso
Worbla is a thermoplastic sheet which can be heated with heat gun or warm water. The material then gets flexible and can be shaped, bent or molded in any way, and even better remolded if you need the materials for something else later. You only need scissors to cut it, and all leftovers can be molded together so you don't waste any material. 


You should check out Kamui's video tutorials. She uses a double layer of worbla, but for my VI chest armor I only used one layer.

Gesso is a primer used to smooth out the surface of worbla before paint, usually 10 layers are used. Gesso can me mixed with wood glue to achieve smootheness faster, or wood glue alone can also work. Here are my result from my first test with Gesso.

Corsets
I actually found this very good tutorial for making corset patterns a while back. And when you have a good pattern to you measurements the sewing is quite easy. Here is a link to my Morrigan (Dragon Age) corset. 

SFX makeup
There are many ways to do something extra with your makeup. I have tried out some of them and will share with you what to do. I have mostly worked with latex og gelatin. They are both cheap and somewhat easy to work with. 

Latex. 

Gelatin. 


To be covered: 
  • Filler
  • Plaster
  • wig styling 
  • needle felting
  • make up
  • card board and faux leather
  • foam 
  • thermo vaccuuming
Any other methodes you are missing and want me to try, comment below.

lørdag 20. juli 2013

Vi pauldrons and leg armor - how to make

To make your Vi complete you need bid ass pauldrons and some leg armor. Take a look here to how to build te rest of the costume.

For this part I sadly left my documenting skills far away, meaning I forgot to take progress photos. But I managed to scavenge some. 

For my Pauldrons I used first a shell of paper mache (strips of news paper and water with flour works) over a balloon. And then you cover this shell with expanding foam. Kamui have some great videos about this technique. 

And carve away


Comparison

The expanding foam is full of air pockets and to make it easier to make a smooth surface I'll cover it again with paper mache. And we are in luck, Kamui even has a video about this step too, how to cover with paper mache (since I forgot to take pictures)

And I like to cover my layer of paper mache with filler again to make a really smooth surface. And now sanding. 

To make it easier for myself I covered the "side parts" of the pauldrons with cardboard instead of paper mache. And here stops my documentation of this project. 

All the gold parts are sheets of cardboard. The round piece is thin foam mat (craft foam would work very well). Same goes for the piece sticking out on the end there. The gold on these parts are also cardboard.


 As for the paint I have used the same grey as on the chest piece with a thin mist layer of silver on top. Battle damage is made with black and silver markers. And everything is sealed with transparent paint.

A small tip to make sure the collar of the jacket stays up, attach it to the pauldrons using velcro. 

And this is how gorgeous it looks inside. 


The knee armor
The base again is paper mache over a balloon. The bolts are paper clay and a strip of neoprene around the edge.  

Painted purple...

and weathered. 


The leg armor
The legs are bent cardboard reinforced with plaster strips on the back. I made these before I discovered worbla and I would recommend that instead of card board as these will most probable crack after a couple of uses. 


So this was a very short description on how I made the pauldrons and leg armor. 

I still need to add some battle damage and a clear coat to the leg bracers, but in short this is one way to do it. Ask if I shall deepen on the steps. 

Here are links to the rest of my Vi tutorials