I used this project to try out new ways of working with worbla, including black worbla and laser cutting worbla. ;)
Chest piece
The base build is very much like how I made my Vi chest piece. Then I added several detail in layers to create more details. This was my first encounter with black worbla, read more about that here. I must say I prefer the "normal" kind better, I feel it glued itself to itself better ;)
Testing out how to make details with black worbla by hand.
Black and normal worbla mixes well.
Mostly because I had to wait for the weather to get warm enough for spray painting outside, I tested the limits of the laser cutter and worbla. More on how to do that in this post.
The paint job for the first iteration was just silver base paint and a black acrylic paint wash for weathering. Then I added a little black dry brushing to create more grit and depth. Silver markers were used to create highlights. And lastly for the laser cut details I used a mix between bronze dry brushing and gold marker. This is basically how I did the paint job for all of the armor parts :)
Pauldrons
I wanted pauldrons, because reasons. I started with a double layers of worbla and stretched it over an acrylic sphere.
To not get it completely dome shaped it reshaped it narrower by hand and added the lower piece.
First laser cut test. All the files I used for worbla details were actually files I already had made for the sword, just scaled differently. I'm even recycling my digital files here ;)
With a flat tool I pressed down sections of the worbla to create more dimension.
Dimensions vs flat
Belt
I already knew I wanted a red corset and skirt and to break up the monotone color I wanted to add a belt (inspired from the movie version). This was made basically from strips of foam covered in worbla and then shaped around my hips.
Smaller armor parts hang from the belt, but I can take them off If I feel like wearing a simpler costume someday.
This looks a bit more graceful while on my body :p
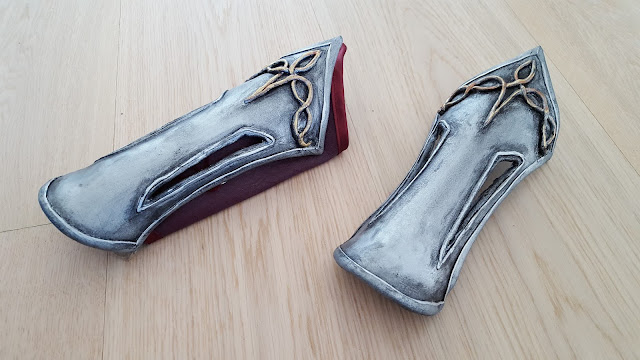
Bracers and grieves.
Sadly I have no wip photos of the bracers and leg bracers. But here are the finished ones ;)
Head piece
In the comic books Lady Sif wears a Valkyrie inspired headpiece and I think it looks very iconic.
I started with a flat pattern in foam covered in worbla (both sides). When warm I shaped it after my head.
The wings were created by cutting directly in the worbla and foam and separating them slightly.
Every edge were covered with a strip of worbla.
Again I had to wait to better weather and I had the files at hand, so more laser cutting was needed ;)
I think I want to more contrast with golden accents to break up the silver.
Corset
Was done in the beginning of 2015, because I needed a corset for my Qunari and i used it for my Sea Mage later. Points for double usage.
As I got addicted to embroidery the corset was not safe from my needle.
Bolero
The movie version of Sif wears a bolero jacket which could work as a anchor point for the pauldrons.
It was really hard to create a good fit for this jacket. Luckily for me I didn't have to follow a reference photo.
Skirt
And of course I wanted a roman warrior style skirt. Sewn out of the same red pleather as the corset and bolero, and lined with red canvas.
And this is where the embroidery mania started
The completed skirt is made in two parts and laced in the sides.
Sword
Ah, the sword. Laser cut from plywood
And this is where I made the vector file for the laser cut parts in the first place.
Details added to the sword.
Silver paint
Quick and dirty canvas wrap for the handle, pleather next up.
And here are a few photos from the visit to the Children's ward at Rikshospitalet in Oslo. A few cosplayers were invited to dress up as superheroes and entertain the children. Which was the reason I hurried up to finish this cosplay ;)
Can't wait to take more photos of this cosplay.


