mandag 3. juni 2013

How to build Vi shoes

This is a tutorial for how I built the shoes for my Vi (League of Legend) cosplay. 

For my first iteration of my Vi costume I didn't have the time to think about the shoes. But now I do, and they need to be ready for Närcon and NCC

These are the shoes on the in game model which I used mostly as a reference. (Again I want the splash art shoes, but they are not visible)
Chrix Design
Ingame model from lolking.net

I started of with a pair of wedge heels shoes.

On the heel I build up with foam mat pieces.

And added a piece of cardboard over


 Then I build up with foam on the fron of the shoe


 And covered the foam with cardboard.  


Next I took a piece of thin foam (yoga mat, yes really) And covered it with black faux leather. 


And glued that part to the front of the shoe

 Then I covered the heel with the same black faux leather


For texture and detailing I glued on a piece of grey faux leather on each side of the shoe. 

Next up is to clean all the edges and prep the shoes for painting. I will first try to even out the black shade and then detail it with silver spay paint

Silver highlights

More shading

I will do a little more detailing and clean up some edges, but I wanted to post this now :)

In my next post will quickly show how to make Vi goggles. 

For an alternative way to make these shoes check out Shinju who also made a pair of Vi shoes. 

onsdag 29. mai 2013

How to build Vi chestplate

For this chestplate I finally got a chance to use Worbla (I bought it from coscraft). Preveously I have biuld the chest armor for my Dovahkiin costume, but that was a raw and unprecise methode (although very cheap)

My other Vi costume tutorials. 

So Worbla it is! If you haven't heard of this material before let me give you a few facts. It is a thermoplastic sheet which can be heated with heat gun or warm water. the material then gets flexible and can be shaped, bent or molded in any way, and even better remolded if you need the materials for something else later. You only need scissors to cut it, and all leftovers can be molded together so you don't waste any material.

You should check out Kamui's video tutorials. She uses a double layer of worbla, but I am only going to use one layer and reinforce it with a fabric lining later.

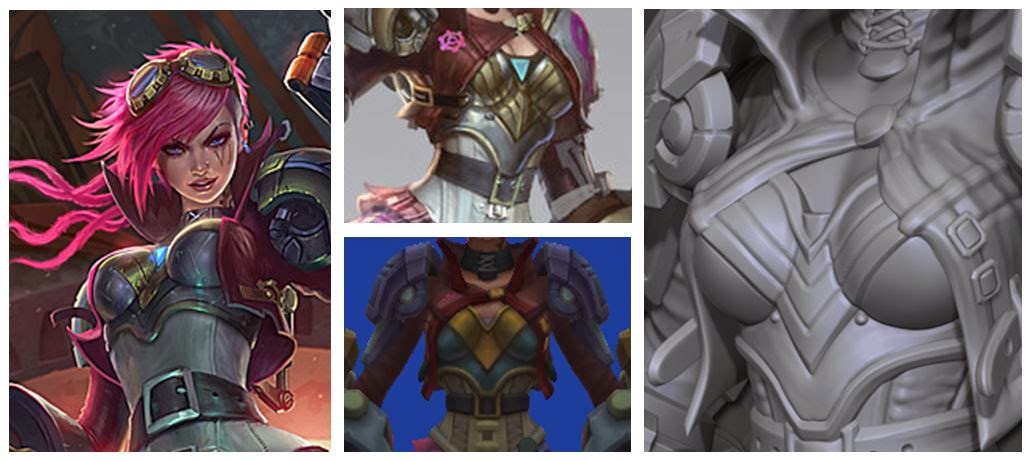
I was going to build this

There are some differences between the in game model and the splash art, but since there is only one photo of the version I want I had to supplement the design with details from other photos.

Step one: make the pattern, I just traced a bra ;)


And cut out the shape in Worbla. Then I heated it and shaped it around my body. This would have been easier with a manequin.


For the cups you can use whatever half spheres you can find in the right size. I ended up with using the paldrons from my big sister costume as a base. For good measure I sprayed cooking grease on my mold. When the piece of worbla was warm and plyable I used my hands to shape it over my mold. Be careful not to stretch it too much as it will get thinner and eventually tear.


To attach the cups to the rest you simply warm up the edges and worbla will stick to itself, no glue needed. And it sticks surprisingly well together.


 Careful not to tear it.

then I covered the top with masking tape to draw up the details.


 Transfer the pattern to worbla and cut out.

 Warm up the pices and squeeze on the chestplate.


During the process some bulks appeared, but just reheat that area and use you hands to smoothen the bumps out.

In an later tutorial I will write about how to paint worbla.

More Vi tutorials.

mandag 27. mai 2013

Elvish Pauldrons

It was fun being an elf, but more armor is better. This pauldron is made out of cardboard and faux leather, held together by glue and studs. I have previously made an elvish staff, tutorial here.

Tip: If you only make one you don't have to struggle with making a symmetrical pair.

Pauldron


Start by cutting out the shapes you need in cardcoard. I wanted five layers and a ring going around my upper arm. 

For the top layer and the ring around my arm I wanted more details. I glued on strips of foam mat in the pattern I wanted.  

And then I covered all the cardboard pieces with faux leather. For the pieces with foam strips I was careful to glue down the fabric as close to the details as possible and making sure it stayed glued on.  

For the edges I glued on a ribbon. Note: before you do this you should glue on another fabric on the backside of every piece, since you will see the underside from some angles and it is easier to glue that on before you attach the ribbons. 


Then do a test assembly. All the pieces are held together with studs, also know as brads a reader was kind enough to tell me. I love it when you help me make the tutorials better, and when I get to learn what the materials actually is called. 

Seen in use in the picture below. 

The pauldron is attached with a faux leather strap going under the arm on the opposite side and fastened with a buckle in front. 

On the backside the strap is only glued on. Use a dry brush and add some gold paint to highlight the details. For corners and edges that do not look perfect use studs or cardboard ornaments painted gold to cover up as you can see on the picture under.

Update: Here is a little more information about the studs I used. The larger ones are called furniture studs or upholstery nails, and can be bought at a hardware store, craft store or on ebay. I used pliers to bend the ends when punctures though the pauldron. 

The smaller ones I am not 100% sure what is called, but I bought them at my local craft store Panduro in Norway. 

Edit: I got information in a comments that the small ones are called "brads" -  you learn something every day :)


In action


I have also made a set of Skull Pauldrons for my Death Elf costume. 

fredag 17. mai 2013

Zombie mashup

This is a presentation of some of the Zombie makeups I have made the past years. Hope you enjoy. Here is a tutorial for how I made the makeup with torn face and exposed teeth

Photo: Danarki

Photo: Danarki

Photo: Henrik Helino

Photo: Danarki Editing: Digikill

Photo: Aslak Sødal

Photo: Karin Olava Pettersen

Next on my Zombie agenda is helping Powerstream Productions with makeup tips for their upcoming zombie movie. Stay tuned.