onsdag 29. mai 2013

How to build Vi chestplate

For this chestplate I finally got a chance to use Worbla (I bought it from coscraft). Preveously I have biuld the chest armor for my Dovahkiin costume, but that was a raw and unprecise methode (although very cheap)

My other Vi costume tutorials. 

So Worbla it is! If you haven't heard of this material before let me give you a few facts. It is a thermoplastic sheet which can be heated with heat gun or warm water. the material then gets flexible and can be shaped, bent or molded in any way, and even better remolded if you need the materials for something else later. You only need scissors to cut it, and all leftovers can be molded together so you don't waste any material.

You should check out Kamui's video tutorials. She uses a double layer of worbla, but I am only going to use one layer and reinforce it with a fabric lining later.

I was going to build this
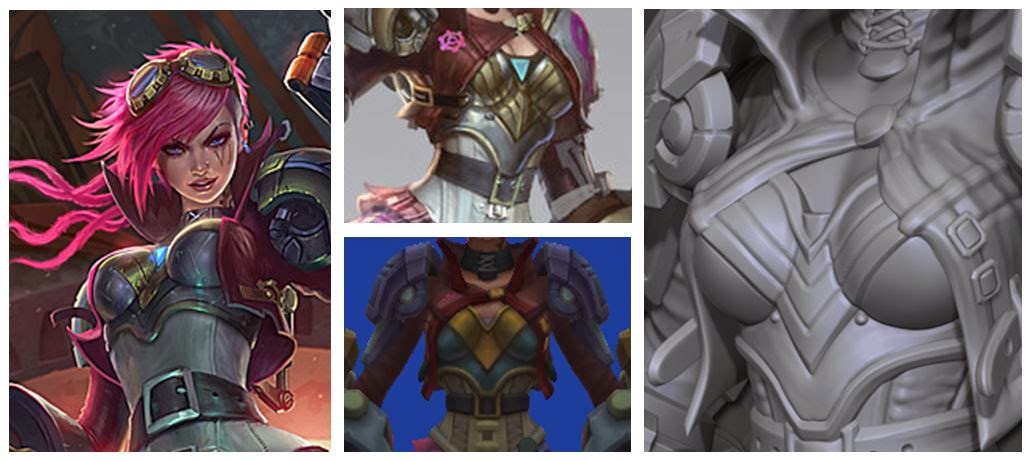
There are some differences between the in game model and the splash art, but since there is only one photo of the version I want I had to supplement the design with details from other photos.

Step one: make the pattern, I just traced a bra ;)


And cut out the shape in Worbla. Then I heated it and shaped it around my body. This would have been easier with a manequin.


For the cups you can use whatever half spheres you can find in the right size. I ended up with using the paldrons from my big sister costume as a base. For good measure I sprayed cooking grease on my mold. When the piece of worbla was warm and plyable I used my hands to shape it over my mold. Be careful not to stretch it too much as it will get thinner and eventually tear.


To attach the cups to the rest you simply warm up the edges and worbla will stick to itself, no glue needed. And it sticks surprisingly well together.


 Careful not to tear it.

then I covered the top with masking tape to draw up the details.


 Transfer the pattern to worbla and cut out.

 Warm up the pices and squeeze on the chestplate.


During the process some bulks appeared, but just reheat that area and use you hands to smoothen the bumps out.

In an later tutorial I will write about how to paint worbla.

More Vi tutorials.

mandag 27. mai 2013

Elvish Pauldrons

It was fun being an elf, but more armor is better. This pauldron is made out of cardboard and faux leather, held together by glue and studs. I have previously made an elvish staff, tutorial here.

Tip: If you only make one you don't have to struggle with making a symmetrical pair.

Pauldron


Start by cutting out the shapes you need in cardcoard. I wanted five layers and a ring going around my upper arm. 

For the top layer and the ring around my arm I wanted more details. I glued on strips of foam mat in the pattern I wanted.  

And then I covered all the cardboard pieces with faux leather. For the pieces with foam strips I was careful to glue down the fabric as close to the details as possible and making sure it stayed glued on.  

For the edges I glued on a ribbon. Note: before you do this you should glue on another fabric on the backside of every piece, since you will see the underside from some angles and it is easier to glue that on before you attach the ribbons. 


Then do a test assembly. All the pieces are held together with studs, also know as brads a reader was kind enough to tell me. I love it when you help me make the tutorials better, and when I get to learn what the materials actually is called. 

Seen in use in the picture below. 

The pauldron is attached with a faux leather strap going under the arm on the opposite side and fastened with a buckle in front. 

On the backside the strap is only glued on. Use a dry brush and add some gold paint to highlight the details. For corners and edges that do not look perfect use studs or cardboard ornaments painted gold to cover up as you can see on the picture under.

Update: Here is a little more information about the studs I used. The larger ones are called furniture studs or upholstery nails, and can be bought at a hardware store, craft store or on ebay. I used pliers to bend the ends when punctures though the pauldron. 

The smaller ones I am not 100% sure what is called, but I bought them at my local craft store Panduro in Norway. 

Edit: I got information in a comments that the small ones are called "brads" -  you learn something every day :)


In action


I have also made a set of Skull Pauldrons for my Death Elf costume. 

fredag 17. mai 2013

Zombie mashup

This is a presentation of some of the Zombie makeups I have made the past years. Hope you enjoy. Here is a tutorial for how I made the makeup with torn face and exposed teeth

Photo: Danarki

Photo: Danarki

Photo: Henrik Helino

Photo: Danarki Editing: Digikill

Photo: Aslak Sødal

Photo: Karin Olava Pettersen

Next on my Zombie agenda is helping Powerstream Productions with makeup tips for their upcoming zombie movie. Stay tuned. 

tirsdag 14. mai 2013

How to build Vi hands from League of Legends

I have gotten many request to make a tutorial for how I built my Vi hands. As always my documentation skills are not sufficient, but I will try to cover this build as best I can with some simple hand drawings. There is also a part two where I upgrade the hands.

These are my hands (a little flat at this point in the build)
Photo: Pål Andresen

I made my hands based on the concept art and not the in game model, there are some differences and in the end I thought these looked better. 

To make the build easier I divided the hands into four parts as shown under. 

The core is the bottom base with the pistons and "the tube" where you put your hands. The core is attached to the knuckles, where all the electronics are hid. All the fingers are attached to the knuckle. And on the back there the pressure gauge is placed. 

I will also try to explain the mechanics of the fingers and electronics. 

Core
Foam mat and cardcoard for the base, and a cylinder for where your arms will go. 


 Details


The pistons are made of several sized cylinders inside each others (like toilet paper cores)

Knuckles
In one of the picture above you can see an early stage of the knuckles. These are made out of Styrofoam and cardboard. In principle I used this shape to build it. 


The red circles are "those small white dishes you get at a cafeteria". Gotta love recycling. 


Fingers
I wanted the fingers to be able to move. To make it easier for me the thumb is static. My idea was very simple, a finger with three hinges and a fishline attached to the first joint. The fishline ends in a metal ring so I can control it with my own fingers. 


So I made eight cardboard fingers as shown under. At every joint there is a spring on the underside and a elastic band on the over side (as to stretch the fingers out automatically) 

Above the hinges I glued on a bit of folded foam mat painted gold. 

The fingers are attached to the "knuckles" using contact glue and hot glue. 

I move the fingers by pulling the metal rings that are attached to the fishwire. I have tried to illustrate it better in the picture below. 

And here are the metal rings in the "hand cylinder." I also glued in a small plastic tube for a "handle", makes it easier to operate the hands.  

This video shows the principle of the mechanic of the finger movement

The back
The back of the hands are made with a cardboard base with foam mat pieces on top. 

The foam pieces were covered with filler, then painted. 

I was mening to cast the blue crystal in epoxy, but I didn't finish the mold on time. That will come in the next iteration. 

The pressure gauge is made with a paper needle and and a nail. The "glass" is simply a circle cut out from the lid of a take away sushi box. But any transparent plastic will do. Around it I have just used a strip of foam.


The electronics
In the hollow part of the knuckles I hid a battery and lined up four red and a blue LED in series with a switch on the front. Gives a little extra while standing on the stage in the dark. 


The result (after upgrading, more info under photo)
Photo Joacim Schwartz


There are several things I will upgrade in my second iteration since I'm wearing this at NCC. I will build up the back of the hand, it is a little too flat now. I will also improve the fingers and all edges. And finish the mold for the blue crystal. 

So Check out the upgrade tutorial

Also Ryan Brandt made a genderbender version of Vi and posted a youtube video of his experience and thoughts about the build process. Might be useful to get a few more pointers to ass even more details. 


And who knows, maybe I can get it to steam ;) 
Update: Yes, I got it to steam