I love fall and Halloween, all the colors and creepy creative. And every year I make a few looks inspired by this season. Here you can see some of my earlier tutorials, eg how to make a zombie makeup. For this season I give you fist a cute look with the witch Mercy(closet cosplay)
And another closet cosplay Emily from Corpse Bride
I also visited the children's ward again as a Spider Queen (updated version)
Photo by cosplay.studio and reflective.photography
And here's the full group of cosplayers, with Nordic garrison in strong numbers.
And while in the middle of taking off the makeup I realized this could be a great look with a bald cap too - Spider Alien.
I also hosted my own Halloween party this year (I never get the time to do so) And created this clown inspired look.
All of NCC team Norway 2017 represent, me, Superhero Girl Creations and Bettcanard.
And as a tradition I made a new purse for my costume, to match my freak show spirit of the night.
Lastly there was a Halloween part at the office at work and my darling sister Bettcanard casted a third eye for me and I created this Fortune teller look.
I won't write a very detailed tutorial for this cosplay as you can already find one of the excellent work by Kamui Cosplay. But I really wanted to make to purple wizard from the Diablo 3 concept art by Wei Wang. And there are a few details I still want to highlight, and I want to add some photos of my version. And I had a huge focus on how to design the attachment so I would not be dependable on other to get dressed.
Official art by Wei Wang
The crown Made by sandwiching a piece of foam between two layers of worbla.
Heated up and bent into shape. added some more worbla details.
But the main difference between my costume and Kamui is the crystals. I did not have any more resin left and ended up shaping transparent worbla over spoons and then painting the inside of the domes with nail polish. Also: it is quite cheap and doesn't need special ventilation.
and the wig The wig was styled and I added ribbons and beads to match the wizard style.
The makeup Quite ordinary beauty makeup with some oriental inspiration. I might post a video about this later.
The chest armor My progress is very similar to Kamui here, and she even made a video of her process.
I forgot to take any more progress pictures. But I spent a lot of time on painting, using airbrush, markers, dry brushing and fine tip detailing.
To have the harness blend in with the costume I covered the straps with the same fabrics as the garment I would wear under. I attach it only with a clip buckle in the back (super easy).
and the shoulders Which will be attached to the breastplate harness. But I made with with folding worbla over foam shapes and adding more details.
For super easy attachment I first put on the chest plate, then I put on the shoulders as a separate piece (this way I can take them off in case I want to wear a jacket etc). The shoulders are attached in the front with veldro.
The Dress I loved making the light purple dress the wizard wears under the armor and corset. To keep the fabric from fraying every seam is finished with an serger.
Here are some of the smaller details under the arms. The skirt was lined
The corset I used a previously made pattern and sewed a under bust corset from a black brocade fabric. For the details I sewed on red Asian inspired fabric on top and made the ornaments from worbla.
The golden details were made from worbla.
The scrolls On one hip the wizard wears a set of three scrolls. These are made from cardboard with foam and worbla details.
They are sewed onto a red flap. This flap is sewn as a pocket with a welt pocket opening.
The spell book On the other hip the wizard wears a spell book. This I made hollow using MDF and faux leather. The spine is curved worbla and everything is glued together using contact glue. The corner details are bought online.
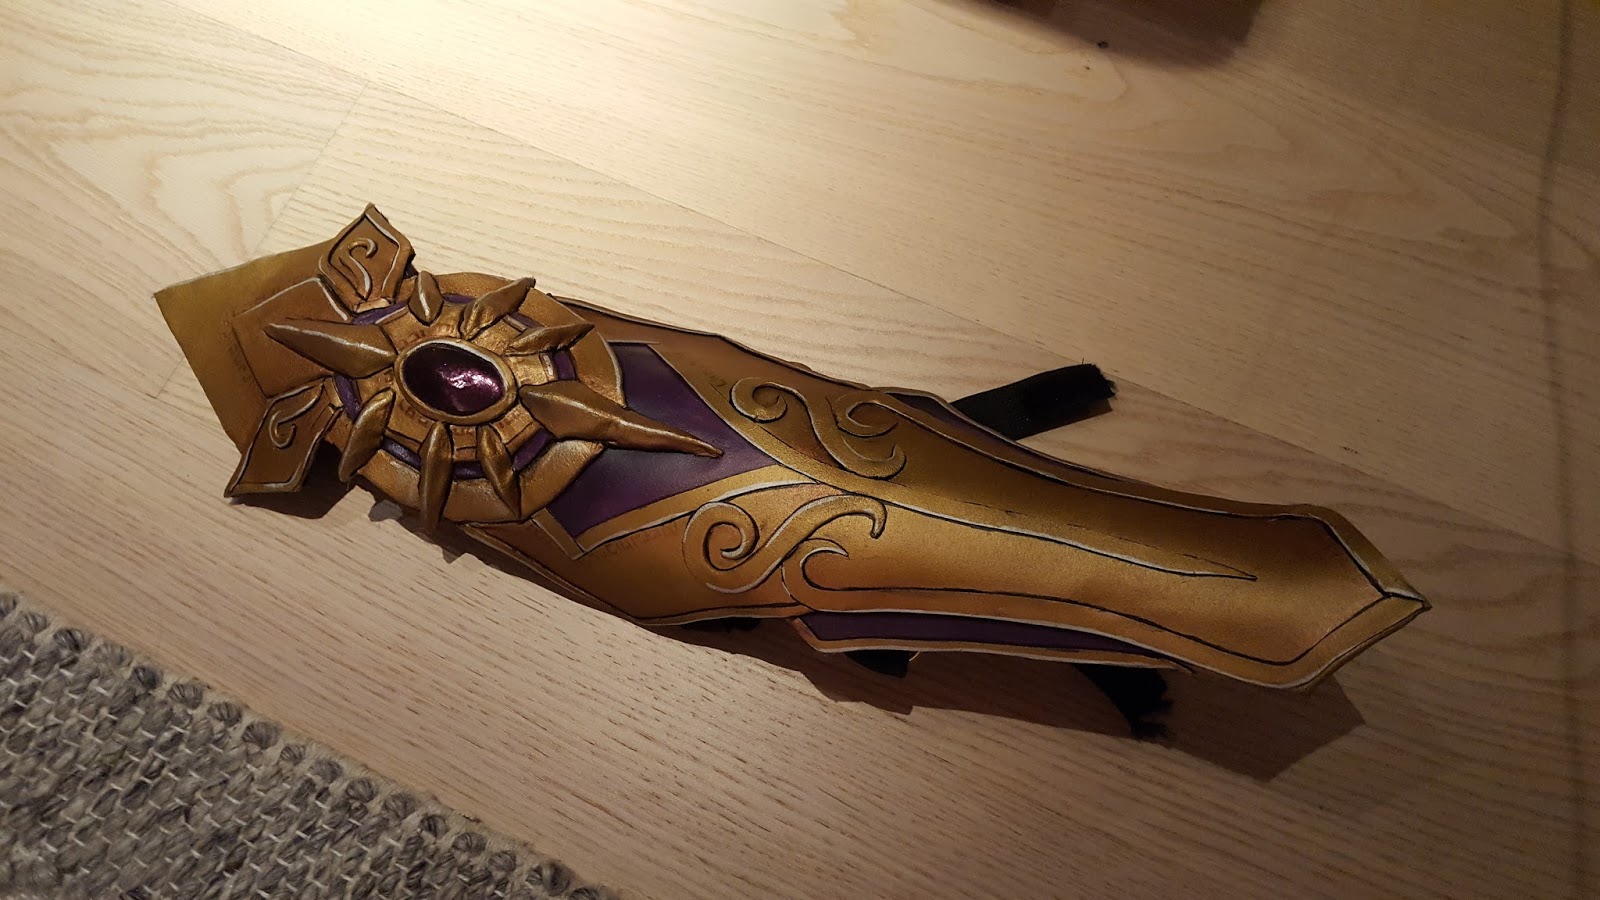
The arm bracers and shin guards Much the same as a the rest of the armor parts, covering foam with worbla, shaping it and adding worbla details.
The backsides are all covered with black felt, both for comfort and to hide the ugly backside when using the edge fold method. Both arm and leg bracers are attached using elastic bands and velcro.
The gloves These are actually kinda cool. I did not sew the gloves, but the finger armor is made from laser cutting worbla using a filigree vector pattern I made, scaling for each finger and each joint. Then each worbla piece was shaped to my fingers, painted, detailed, first glued on and then secured with small stitches.
The leggings I did not fancy showing so much thigh (it gets cold) and to prevent the stay up stockings from slipping I rather sewed everything as one pair of leggings. The black parts was a high DIN legging where I cut off the top and then resewed the top part in a flesh toned stretch fabric with a Serger. Then I cut a hole for the heel of the shoe.
The shoes Also made from worbla and designed so they can be taken off the show base.
Most of the look
The sword I needed a weapon and a sword would fit my idea for a performance. I based the design off another Wizard reference photo and a Tai Chi Sword design.
With this design I made vector files in InDesign and laser cut the shapes in plywood.
The middle was made hollow so I could add two strips of green LED lights. These were covered with polymorph (both for stability and to diffuse the lights)
And to be able to change battery I used a soda bottle and cap.
I will post more photos after I have had a photoshoot, both of the entire costume and details of the costume. While we wait for that here's my performance from Desucon Cosplay and Japan 2107