An easy way to make Skyrim helmet for cosplay. See part 2 for how to upgrade your helmet

Photo: Grethe Bentsen
Utdate: This is what is ended up looking after the second iteration

Photo: Kake Yamamura/Kakeboksen
You don't have to invest a large amount to make props. This is how I made the standard helmet from Bethesta Elder Scrolls Skyrim. This helmet is made with a short deadline and with limited budget (about 200 NOK)
“Where to start”

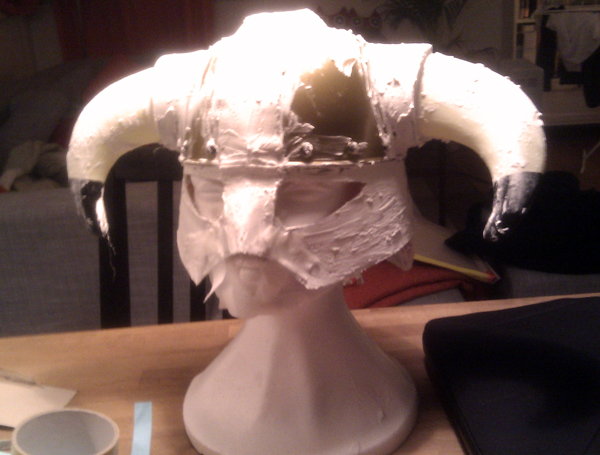
Due to a short deadline I used a "Viking helmet" as a base, this one bought at Festmagasinet Standard, in Oslo. And then some work, the horns had to be turned, shortened and tilted.
Next step was adjusting cardboard. These were fastened with tape while adjusting and hot glued it when I was satisfied. For the transition from the horn to the helmet base I used foam mat.

Filler!
Filler is mostly used to smoothen transitions, fill out cracks and bumps and make a homogeneous surface prior to painting. For larges build up I recommend using plaster since thick layers of filler can easily crack. Therefore use thin layers.

Filler needs a lot of sanding, but the surface of the helmet is rough so I don't have to invest that many hours sanding. (And I was short of time).

Then you need to add texture and details to the horns. I used paper clay, dries fast, easy to mold and can be sanded and painted. I used the back of a knife to mold the horns after applying the clay.
Finishing.

When you have a homogeneous surface then you can prime your helmet. Then two coats of silver paint, remember good ventilation and mask. Check the specifications for your paint, but wait at least a couple of hours between paint coats and the 24 hours before further work.
Weathering.

The best part of making a prop (personal opinion) is weathering, adding dimension through detailing. I used cheap acrylic paint, watered out, painted on and partly dried it off with a cloth Add extra paint in cracks. Volpin have a really good video showing this process in detail.
For the horns I added a shade of yellow paint, darker at the base of each new "layer" on the horns. Extra detailing: blood spatter, less is better. Finish off with a clear coat paint to preserve weathering.
Fus roh dah!

Note: the horns are not accurate to the helmet in the game. I will upgrade this helmet during may 2012.


Hi :) Your work is awesome ! I want to make a helmet like you did but i can't figure out what "filler" is (I'm german).
SvarSlettHi, danke :) Filler is almost like "bondo" (in norwegian it is called "sparkel") Vielleicht es heißt verfugen in deutsch? I think it is better than plaster because it is easier to sand down. This is an exaple: http://www.clasohlson.com/no/CascoSpack-S-sparkel/Pr349777000
SvarSlettah ok, that's what I thougt :) it's called "spachtelpaste" and it is used to "verfungen" (like you said)
SvarSlettThank you very much! I'm looking forward to making my won skyrim helmet now :)
Hei : D
SvarSlettJeg lurere litt på hvordan du lager "paper clay". Jeg har laget det før men jeg har ikke fått det til å bli så glatt som det ser ut på bildet. Kjøper du det eller lager du det selv?
Hei. Jeg har brukt denne fra Clas Ohlson: http://www.clasohlson.com/no/Das-Pronto-leire/Pr349305000
SvarSlettDen tørker i luft, er lett å pusse og å male på. Annen pappmasje jeg har laget er kun med avispapir, mel og vann og får en mye grovere overflate - se Iron Armor: http://chrixdesign.blogspot.no/2012/07/skyrim-cosplay-iron-armor-in-progress.html